Magnetic Flux Leakage Testing

Magnetic Flux Leakage (MFL) is an electromagnetic NDE technique. MFL technique uses sensor for detection of leakage magnetic fields in comparison with ferromagnetic particles/powders used in magnetic particle testing (MPT). The use of sensor enables incorporation of latest advances in field sensing devices towards enhanced detection as well as quantitative sizing of deep surface defects and this is a clear advantage over MPT. MFL technique is widely used in industry for assessing the quality and structural integrity of ferromagnetic components. With the development of new sensor materials, digital devices and microelectronic systems, the capabilities and applications of MFL technique have increased significantly. Further, numerical models have enabled design of optimized MFL systems and sensors, besides better understanding of the phenomenon and the interactions.

Principle

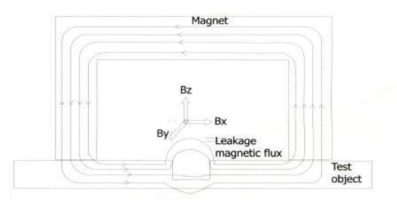
In MFL technique, the test object is uniformly magnetized, close to magnetic saturation. If any defect is present in the object, due to reduction in effective magnetic permeability and cross sectional area, magnetic flux lines leak out of the object surface around the defect. The leakage flux in three directions viz, Bx (along the measurement surface and perpendicular to the length of the defect), By(along the measurement surface and parallel to the length of the defect), Bz (perpendicular to the measurement surface) can be measured using magnetic field sensors and can be correlated with the shape and size of the defect responsible for the leakage flux.
Reference codes and standards

  • ASME Section V, Article 16
  • ASTM E 1571-01
  • ISO 10893-3
Magnetic Flux Leakage Testing

Features of the Technique

  • Detection of corrosion, cracks, gouges and dents in pipelines and storage tank floors.
  • Detection of localized flaws and loss of metallic cross sectional area in wire ropes.
  • High sensitivity for detection of small surface cracks in components without removal of paint or rust.
  • Automatic MFL testing of axi-symmetric components in production line.
  • Inspection of hot objects.

Applications

  • On-line inspection of gas transmission pipelines.
  • Testing flaws in storage tank bottom floors.
  • Inspection of wire ropes.
  • Testing of flaws in ferromagnetic tubes and rods.

Limitations of the Technique

  • Applicable only for ferromagnetic materials.
  • It is necessary to ensure that the magnetization is perpendicular to the expected orientation of defects so as to get maximum leakage field at the object surface.
  • Skilled personals are required for data interpretation or for application of signal processing techniques.
  • It is necessary to measure both normal and tangential components for defect sizing.
  • Need for component demagnetization after inspection.

Please fill details to download the brochure