Advanced NDT Services

Weld Inspection By Advanced Ultrasonic (PAUT & TOFD)

Weld Inspection By Advanced Ultrasonic (PAUT & TOFD)

PAUT is an advanced method of ultrasonic testing. Instead of a single element and beam, phased array uses multiple ultrasonic elements and electronic time delays to create beams by constructive and destructive interference. PAUT offers significant technical advantages for weld testing over conventional ultrasonic as the phased array beams can be steered, scanned, swept and focused electronically from a fixed probe position. Beam steering permits the selected beam angles to be optimized ultrasonically by orienting or focusing them perpendicular to the predicted discontinuities.

PAUT is now used for inspecting fabricated piping and pressure vessel welds. The flaw image obtained with multiple angles and beams give a more accurate flaw characterization than conventional ultrasonic inspection. PAUT can be done in semi-automated or a fully automated mode.

For corrosion mapping application a linear array probe mounted on a wheel is used. Results are immediate, can be viewed as well as emailed for further analysis.

TOFD method of ultrasonic testing is a sensitive and accurate method for the non-destructive testing of welds for defects. The use of TOFD enabled crack sizes to be measured more accurately, and in conjunction with FFS studies, the expensive components could be kept in operation with minimal risk of failure.

Measuring the amplitude of reflected signal is a relatively unreliable method of sizing defects because the amplitude strongly depends on the orientation of the crack. Instead of amplitude, TOFD uses the time of flight of an ultrasonic pulse to determine the position of a reflector.

Applications

  • Shell to Dish End Joints.
  • Circular Seam & Long Seam Welds, Joints, T-Joints.
  • Category D Joints / Pressure Part, Weld-o-lets, etc.
  • Structural Welds, Knuckle joint, etc.
  • SS & AS Cladded plate Joints.
  • Boiler Weld Joints (Dia. 1.5” – 4”).

Advantages Of PAUT

  • High-speed inspection using single-axis scans instead of conventional raster scan.
  • Near-optimal focal length and focal spot for various areas of complex parts or thick components.
  • Small, simple probe assembly with multiple beams from a single probe.
  • Easy-to-install, one-axis scanning systems.
  • Better detection in austenitic materials and dissimilar metal (DM) welds.
  • Alternative to Radiographic imaging.

Advantages Of TOFD

  • Full record of examined weld sections in A-Scan, B-Scan, C-Scan, D-Scan and TOFD Scan presentation. Storage of full examination results.
  • Real Time vision on quality of welds by the operator during examination.
  • Accuracy in sizing the through thickness dimensions.
  • High sensitivity in detecting planar, vertical or oriented defects like cracks or lack of fusion not visible by radiography and hardly to detect by standard ultrasonic pulse echo technique. For these reasons ASME Code with the Code Case 2235 has permitted to perform on pressure vessel welds TOFD examination in lieu of radiography.
  • Full control on contact effectiveness and coverage by examining the TOFD map in any time after the examination.
  • Supervision of the examination in the dynamic way as during the scanning on your PC in the office or far away the job.

Tube Inspection by ECT, RFET, NFT, MFL, IRIS

Tube Inspection by ECT, RFET, NFT, MFL, IRIS

Eddy Current Testing

Eddy Current Testing (ECT) works on the principle of electromagnetic induction. In ECT a probe is excited with sinusoidal alternating current to induce eddy current in an electrically conducting material such as stainless steel, aluminium etc. The change in coil impedance that arises due to distortion at regions of discontinuities and associated magnetic flux leakage is measured. This is a surface technique and can readily detect very shallow surface defect and sub-surface defects. ECT is a simple, high-speed, high sensitive, versatile and reliable NDT technique and is popularly used in many engineering industries.

Advantages Of ECT

  • High examination rate, thereby reducing inspection time.
  • Examination of Ferrous and Non Ferrous material
  • Repeatability comparison between historical and subsequent test results to establish corrosion rate and remaining life
  • ECT discriminates between ID and OD defect orientation
  • ECT is sensitive to gradual wall loss, cracking, small pitting etc.

Remote Field Eddy Current Testing

Remote Field Testing (RFT) is one of the several electromagnetic testing methods commonly employed in the field of non-destructive testing. RFT may also referred to as RFEC (Remote Field Eddy Current) or RFET (Remote Field Electromagnetic Technique). RFT is primarily used to inspect ferromagnetic tubing since conventional ECT have difficulty in inspecting the full thickness of the tube wall due to the strong skin effect in ferromagnetic materials.

Advantages Of RFT

  • Detection of wall loss.
  • Ideal for ferrous tubes.
  • RFT can detect defects away from tube support plate and tube sheet.
  • Detect localized corrosion/erosion.
  • Inspect ferromagnetic materials (carbon steel and stainless steel).

Near Field Testing

Near Field Testing (NFT) technology is a rapid and cost-effective solution intended specifically for fin-fan carbon-steel tubing inspection. This technology relies on a simple driver-pickup eddy current probe design providing very simple signal analysis. NFT is specifically suited to the detection of internal corrosion, erosion or pitting in carbon steel tubing. The NFT probes measure lift-off or ‘fill factor’ and convert it to amplitude-based signals. Because eddy-current penetration is limited to the inner surface of the tube, NFT probes are not affected by the fin geometry on the outside of the tube.

Advantages Of NFT

  • NFT is faster than electromagnetic testing techniques.
  • External reference coil is not required during NFT.
  • The results of NFT is unaffected by support plates and Tube sheets.

IRIS – Internal Rotary Inspection System

Internal Rotary Inspection System (IRIS) is an ultrasonic method for testing of pipes and tubes. The ultrasonic beam allows detection of metal loss from the inside and outside of the tube wall. It is a fairly sensitive technique. The sensitivity achieved will depend on tube dimensions and tube cleanliness. Both ferromagnetic and non-ferromagnetic tubes can be inspected. A three dimensional picture of the defect is obtained, thus the defect profile and its depth is provided. Interpretation of results is easier than in the other techniques

Advantages Of IRIS

  • IRIS can be applied on almost each material.
  • Exact determination of location of pitting/corrosion.
  • Small changes in thickness measurable.
  • No negative effect on results caused by external items like fins or baffles.
  • Measurement produces nominal value for wall thickness of pipe.
  • No calibration pipes needed.
  • IRIS can also be used in steam drums.

Remote Visual Inspection (RVI) by specialized Cameras

Remote Visual Inspection (RVI) by specialized Cameras

RVI(boroscopy/Videoscopy) is used to visually inspect plant components for surface defects, general condition, degradation, blockages & foreign materials. It can be used as standalone inspection or as a complement to other NDE techniques, such as eddy current, ultrasonic or x-ray, in order to qualify unclear signals or pinpoint where a more thorough inspection is needed.

We offer a turnkey inspection solutions, whether it is inspecting high energy piping, performing a loose part retrieval or diagnosing an operational problem, we bring the right equipment to visually inspect (or retrieve) it, record it, and report it back to you.

Advantages

  • Blockage detection in piping & tubing’s.
  • Discolouration in process pipping.
  •  Complex component like Gear-Box, Compressors & Turbine  can be Inspected with ease.
  • Foreign material search & retrieval.

Inspection Of Large Vessels

Remote Visual Inspection (RVI) of large surface areas requires an industrial Pan, Tilt, and Zoom (PTZ) camera. The PTZ camera requires openings of 5-inches or more. It can also be submerged underwater up to 100-feet. The auxiliary lamp module provides extra lighting for extremely dark inspection environments.

Application

  • Corrosion protection lining inspection in Cok drum.
  • Floating Roof Inspection.
  • Refractory Linings– Cyclone.
  • Storage Tanks & Spheres.
  • Nuclear fuel bundle serial number verification.

Inspection Of Pipes

We use steerable crawler to inspect pipes ranging from 8” to 48”. These crawlers are well suited for carrying out inspections on pipe systems, especially those that have a lot of bends and pipe branches. The remote pendant easily steers the crawler around multiple elbows & solid obstructions and controls the crawler’s focus, lighting, speed and pan & tilt functions. This is the most common inspection technique to inspect sewer, drain, water, electrical conduit and process lines in various industries.

Advantages

  • Air ducts and electrical conduits.
  • Lube oil and steam lines.
  • Steam headers.
  • Sea Water Lines, Cooling Water Lines, Process Pipelines.

Tubular Inspection by ECA & NFA

Tubular Inspection by ECA & NFA

Eddy Current Array

An eddy current array, in its simplest form, is a series of single elements arranged in a row, allowing users to cover a larger area in a single pass using multiplexing technique as compared to conventional, single-coil probes.

ECA is a major improvement over single-element because:

  • Faster inspections.
  • Wider coverage.
  • Better detection capabilities (Axial and circumferential defects detection).
  • Easier analysis because of simpler scan patterns.
  • Improved positioning and sizing because of encoded data.
  • Eddy current array probes can easily be designed to be flexible or shaped to specifications, making hard-to-reach areas easier to inspect.

Near-Field Array

Near-Field Array (NFA) is the multiplexed evolution of Near Field testing (NFT). Its increased probability of detection, it is an excellent alternative to IRIS in fin-fan air coolers and ferromagnetic heat exchanger tubing.

Advantages Of NFA

  • Inspect air cooler tube with a high-resolution array, providing intuitive C-scans at NFT speeds.
  • Detecting and sizing internal defects in one pass.
  • Detecting axial and circumferential cracks.
  • Easy to use (no magnet = easy to push and pull).
  • In-Service High Temperature PAUT/TOFD.

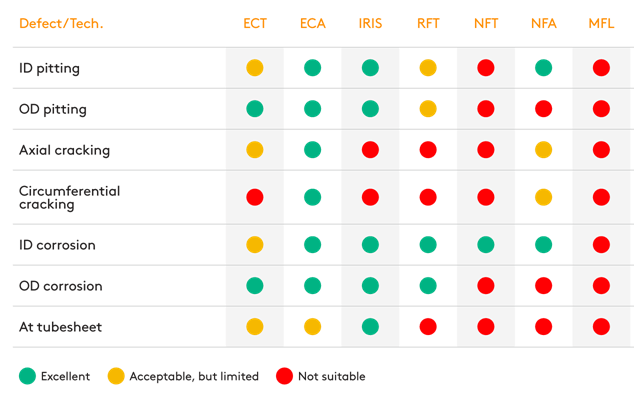
Defect Detection Capabilities in Tubing

Defect-Detection-Capabilities-1

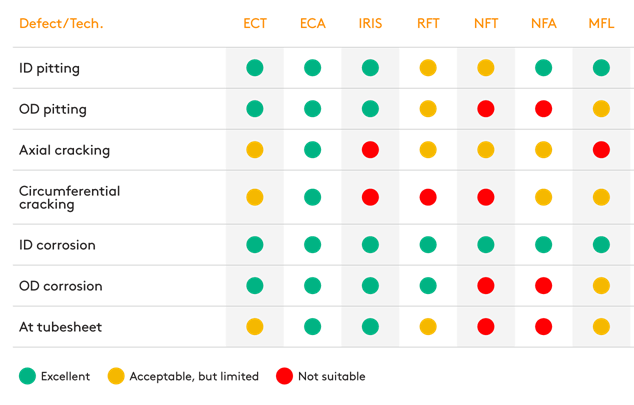
Sizing Capabilities in Tubing

Sizing-Capabilities-2

Wire Rope Testing by MFL

Wire Rope Testing by MFL

Large number of ferrous steel wire ropes is in use in different industries. Premature discard and replacement with the new rope involves in unreasonable costs, while operating the rope, which already reached discard criteria is dangerous. Visual inspection is obvious, but only visual examination is not sufficient due to specific rope design. Non-destructive magnetic inspection of ropes enables to gather comprehensive data for making reasoned decision. Magnetic flux leakage (MFL) equipment with strong magnetization can inspect ropes reliably, and smart software facilitates data interpretation.

Our rope inspection services comprise inspection of the new ropes either during production run or delivered to the customer, and on-site inspection onshore, offshore, above ground and underground. Inspection is carried in accordance with national / international standards and norms. This enables large cost savings as wire ropes can be used safely for a longer period of time.

Applications

  • Offshore & Onshore drilling rigs.
  • Offshore heavy lifting.
  • Onshore cranes.
  • Mining.
  • Aerial cableways.
  • Guided structures.
  • Rope hanging bridges.
  • Electrical transmission line drop .

Advantages

  • Magnetic Flux Leakage based Inspection to Detect Local Flaws (LF) : Broken Wire, Corrosion Pit, Rope Core Cracking, etc.
  • Loss of Metallic Area (LMA) : Volumetric Defects, Abrasion Loss, Loss due to Fatigue, Corrosion Loss, etc.
  • Inspection Speed 4 mtr. per second.
  • Minimal cleaning / surface preparation of rope required as it can negotiate dust and lubricant over the rope.
  • Battery Operated setup, thus easy mobility at remote locations.

CUI (Corrosion Under Insulation) by PECT

CUI (Corrosion Under Insulation) by PECT

Pulse eddy current testing (PECT) is an advance electromagnetic inspection technology which majorly detect remaining wall thickness under insulation in ferrous material. It uses square pulse signal to induced eddy current which can penetrate more deeply in magnetic material than conventional Eddy Currents.

Pulse eddy current testing (PECT) can measure thickness through all insulation materials, coatings, fixed chicken wire, concrete, re-bars, corrosion product, stainless steel sheeting, aluminium sheeting, water marine growth, blistering scabs, through metallic mesh.

Applications

  • Hot & Cold Insulated Line Temp : -33°C To +550°C,
  • Insulated Vessels & Reactors.
  • Insulated Chilled Water Lines.
  • Column Skirting.
  • Jetty Pipelines & Structures.
  • Storage Tank Annular Plate Scanning.
  • Corrosion under fireproofing of supports legs of storage spheres.
  • Remaining ligament underneath corrosion scabs.

Advantages

  • Cost for removal of insulation and re insulation is saved.
  • Reduced Inspection Time resulting in high productivity.
  • Grid mapping mode 2 to 10 time faster (usually <1 s).
  • Less operator dependent.
  • Less affected by lift off variations, weather jacket overlap, straps.
  • Better detection of small defects.
  • Unaffected by structures above probes.
  • 6 mtr length of telescopic pole enables to minimize scaffolding requirement.

Please fill details to download the brochure